System

Debian - nala

Nala is a modern and user-friendly front-end for the APT package manager, designed to enhance the package management experience on Debian systems

Installation

apt install nala

Check Version

nala --version
root@debianxx ~# nala --version
nala 0.15.4

Install Package

nala install btop
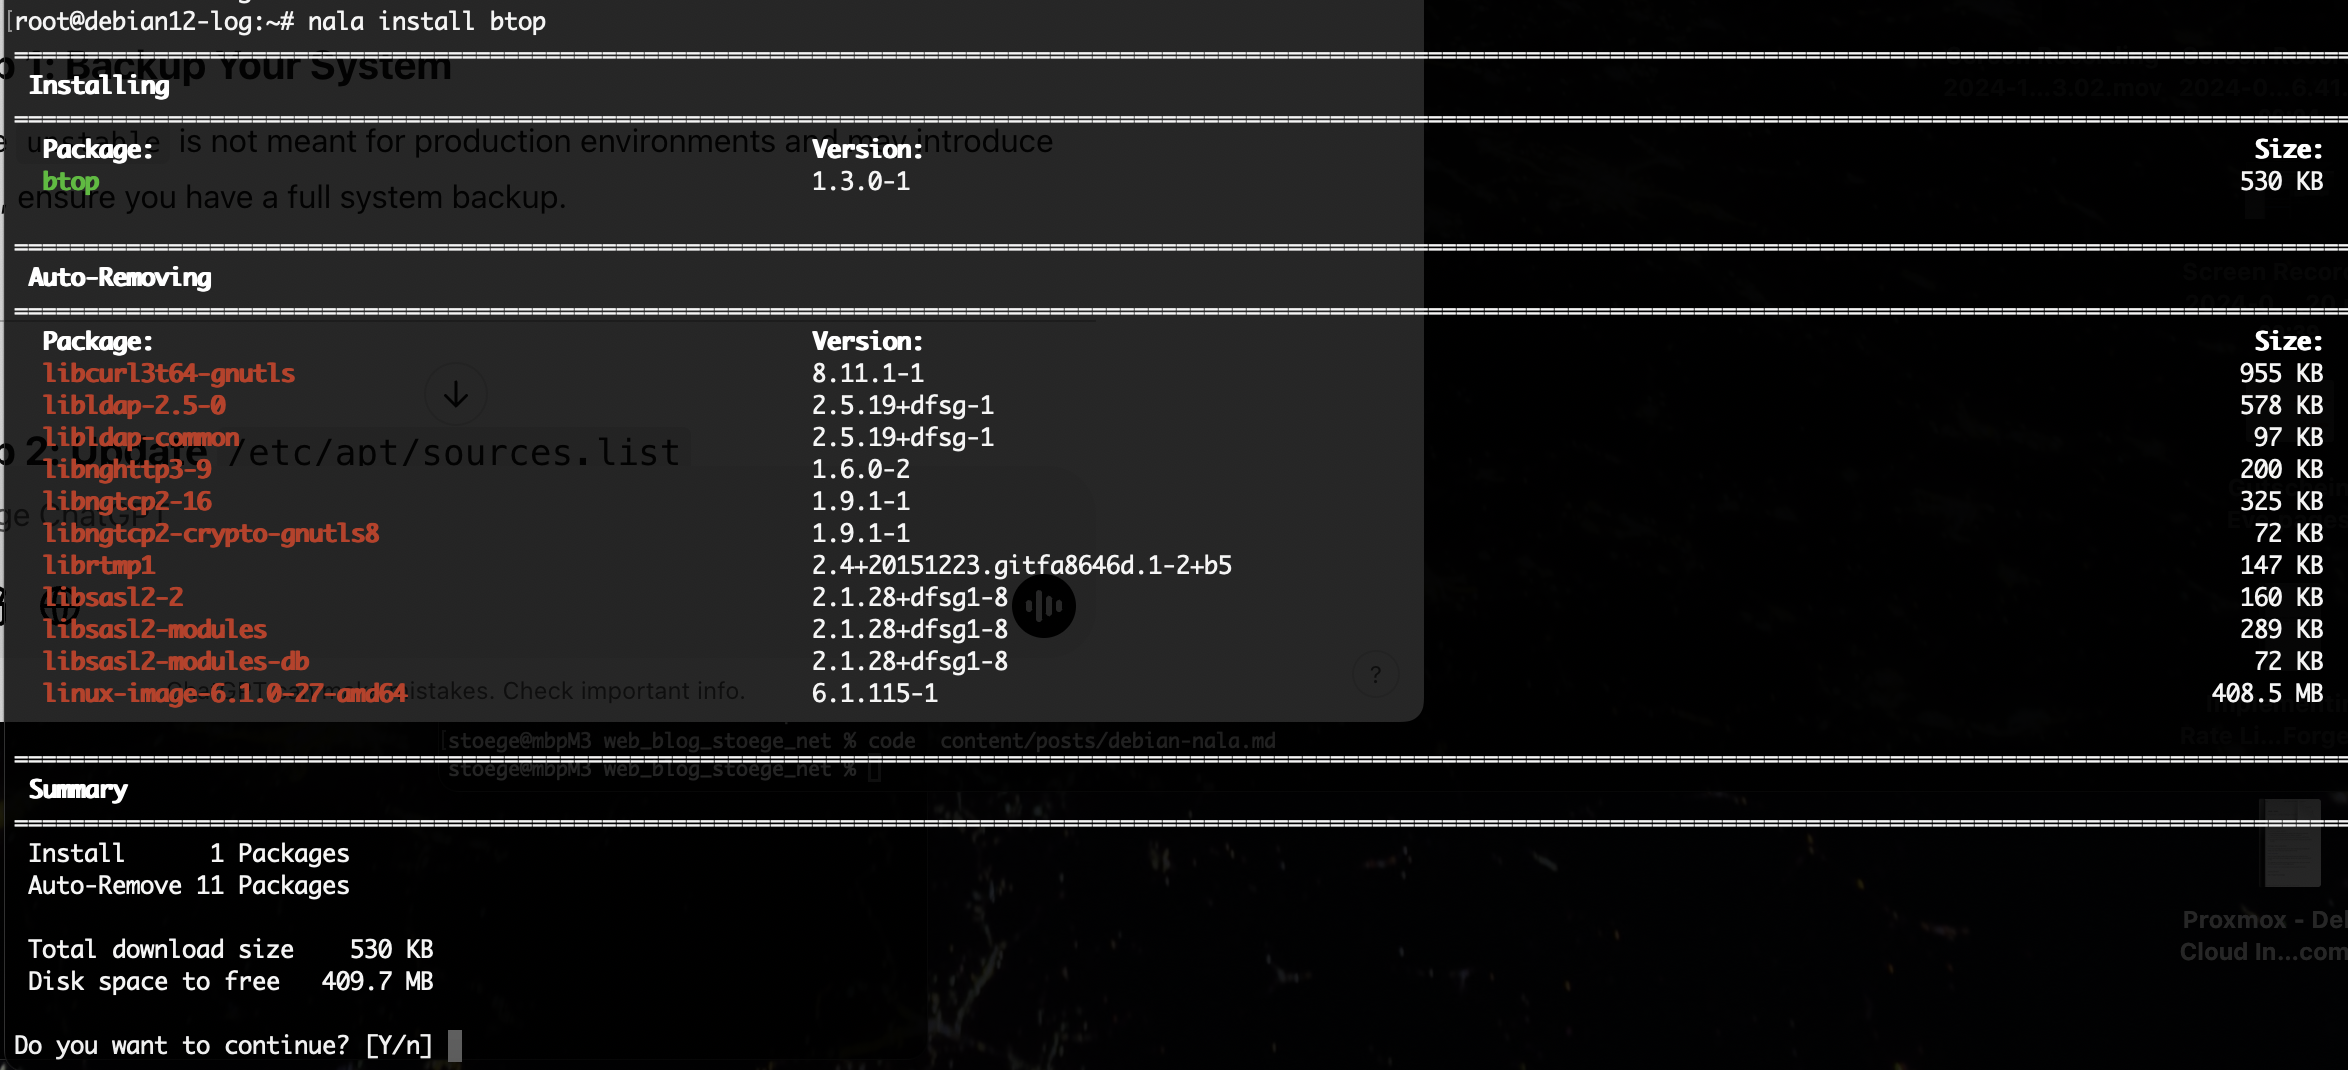
Commands

nala --help
│ autopurge      Autopurge packages that are no longer needed.                                                                                                        │
│ autoremove     Autoremove packages that are no longer needed.                                                                                                       │
│ clean          Clear out the local archive of downloaded package files.                                                                                             │
│ fetch          Fetch fast mirrors to speed up downloads.                                                                                                            │
│ full-upgrade   Upgrade the system by removing/installing/upgrading packages.                                                                                        │
│ history        Show transaction history.                                                                                                                            │
│ install        Install packages.                                                                                                                                    │
│ list           List packages based on package names.                                                                                                                │
│ purge          Purge packages.                                                                                                                                      │
│ remove         Remove packages.                                                                                                                                     │
│ search         Search package names and descriptions.                                                                                                               │
│ show           Show package details.                                                                                                                                │
│ update         Update package list.                                                                                                                                 │
│ upgrade        Upgrade the system by upgrading packages only.       

Commands

nala list       list all packages
nala list -i    list installed packages
nala list -N    list packages installed with nala
nala list -u    list upgradable packages
nala list -h    show help for all list commands ...

Any Comments ?

sha256: 831a68cb00e13085f9eab36dcab94139961c2b083479df6874fd640d0e7ee883

SSH - Legacy Devices

Intro

sometime, one have to access to old and legacy devices. they may do not support the current ciphers and key algorithms, so, we have to modify the “.ssh/config” File or provide some additional cli arguments.

If you have todo this regualary, you may wanna extend the current parameters with the legacy ones like this:

Backup old config

you never know ;)

mv /etc/ssh/ssh_config /etc/ssh/ssh_config-$(date "+%s")

Install Updated Version

you have to copy/paste as root

Debian

Patch OpenSSH Only

apt install --only-upgrade  openssh-client openssh-server openssh-sftp-server

Time Zone

timedatectl set-timezone Europe/Zurich

-> set symlink: /etc/localtime -> ../usr/share/zoneinfo/Europe/Zurich

Fix Sudo Stuff

use ‘sudo -i’ and keep SSH_AUTH_SOCK if set

apt update
apt install sudo
usermod -aG sudo stoege
echo "Defaults env_keep+=SSH_AUTH_SOCK" > /etc/sudoers.d/ssh_auth_sock
echo "%sudo ALL=(ALL) NOPASSWD:ALL" > /etc/sudoers.d/group_sudo_nopass

Any Comments ?

sha256: 7e5018c28bea4357e2f6703ec2876e92798e020801a61e46d6e3698151bc5a38

Mikrotik

Some Commands for Mikrotik NewBees

Quick Guide - CCR2004-1G-12S+2XS

CCR2004-1G-12S+2XS - User Manual

MikroTik wired interface compatibility

Copper SFP (not able todo Auto Negotiation)

/interface/ethernet/set sfp-sfpplus1 auto-negotiation=no

Update Packages

/system package update check-for-updates
/system package update install
reboot

Upgrade Firmware

/system routerboard print
/system routerboard upgrade
/system reboot; 

Reset Config

/system/reset-configuration
  MMM      MMM       KKK                          TTTTTTTTTTT      KKK
  MMMM    MMMM       KKK                          TTTTTTTTTTT      KKK
  MMM MMMM MMM  III  KKK  KKK  RRRRRR     OOOOOO      TTT     III  KKK  KKK
  MMM  MM  MMM  III  KKKKK     RRR  RRR  OOO  OOO     TTT     III  KKKKK
  MMM      MMM  III  KKK KKK   RRRRRR    OOO  OOO     TTT     III  KKK KKK
  MMM      MMM  III  KKK  KKK  RRR  RRR   OOOOOO      TTT     III  KKK  KKK

  MikroTik RouterOS 7.10.1 (c) 1999-2023       https://www.mikrotik.com/

Press F1 for help

-------------------------------------------------------------------------------
The following default configuration has been installed on your router:

Welcome to RouterOS!
   1) Set a strong router password in the System > Users menu
   2) Upgrade the software in the System > Packages menu
   3) Enable firewall on untrusted networks
-----------------------------------------------------------------------------
LAN:
    IP on ether1:    192.168.88.1/24;

-------------------------------------------------------------------------------
You can type "v" to see the exact commands that are used to add and remove
this default configuration, or you can view them later with
'/system default-configuration print' command.
To remove this default configuration type "r" or hit any other key to continue.
If you are connected using the above IP and you remove it, you will be disconnected.

Initial Config

/interface bridge add name=local
/interface bridge port add interface=ether2 bridge=local
/ip address add address=192.168.88.1/24 interface=local

Backup Config

# show full Config
export

# show non defaults
export compact

# show non defaults, hide sensitive stuff
export compact hide-sensitive

# write config to myconfig
export compact hide-sensitive file=myconfig

Any Comments ?

sha256: 4cffb5ddbd4d0059c71e311bc75a67839be888f15291cec9ac6d0c24478fffdd

Restricted Shell

Restricting User to Script

Let’s assume you have some Users around and they should be able to run certain Scripts. These Scripts do various things, login to some systems, perform task, get data from an API, whatever you want. All these Actions needs Credentials which must be available to the script, although they are not part of the Script. They could be Provides via OS Env, .env File, Encrypted Password Store or whatever. But if the Script is able to access these Credentials, a logged in User would could access it also.

MacOS - Kernel Extensions

see: https://nektony.com/how-to/remove-kext-on-mac

System Extensions

> ll /System/Library/Extensions/ |head
total 0
drwxr-xr-x@ 3 root  wheel   96 May 13 00:29 AFKACIPCKext.kext
drwxr-xr-x@ 3 root  wheel   96 May 13 00:29 AFTK_Kext.kext
drwxr-xr-x@ 3 root  wheel   96 May 13 00:29 AGXFirmwareKextG13GRTBuddy.kext
drwxr-xr-x@ 3 root  wheel   96 May 13 00:29 AGXFirmwareKextG13XRTBuddy.kext
drwxr-xr-x@ 3 root  wheel   96 May 13 00:29 AGXFirmwareKextG14GRTBuddy.kext
drwxr-xr-x@ 3 root  wheel   96 May 13 00:29 AGXFirmwareKextG14PRTBuddy.kext
drwxr-xr-x@ 3 root  wheel   96 May 13 00:29 AGXFirmwareKextG14XRTBuddy.kext
drwxr-xr-x@ 3 root  wheel   96 May 13 00:29 AGXFirmwareKextRTBuddy64.kext
drwxr-xr-x@ 3 root  wheel   96 May 13 00:29 AGXG13G.kext

System Extensions

/Library/Apple/System/Library/Extensions> ll
total 0
drwxr-xr-x  3 root  wheel  96 May 13 00:29 AppleKextExcludeList.kext
drwxr-xr-x  3 root  wheel  96 May 13 00:29 AppleMobileDevice.kext

Own Extensions

stoege@play224:~> ll /Library/Extensions/ |head
total 0
drwxr-xr-x@  3 root  wheel    96 May 27 14:11 CH34xVCPDriver.kext
drwxr-xr-x@  3 root  wheel    96 May 27 14:17 Dropbox.kext
drwxr-xr-x   3 root  wheel    96 May 13 00:29 HighPointIOP.kext
drwxr-xr-x   3 root  wheel    96 May 13 00:29 HighPointRR.kext
drwxr-xr-x@  3 root  wheel    96 May 27 14:11 HoRNDIS.kext
drwxr-xr-x@  3 root  wheel    96 May 27 14:18 SiLabsUSBDriver.kext
drwxr-xr-x@  3 root  wheel    96 May 27 14:11 SoftRAID.kext
drwxr-xr-x@ 15 root  wheel   480 May 27 14:10 Unsupported
drwxr-xr-x@ 33 root  wheel  1056 May 27 14:26 backup

Any Comments ?

sha256: 8a9836f3b6b24efeab82363400d893d801e1576f4527a684805be9de0b609617

Vim

as i’m using vim almost every day, why not make some notes to improve the skillz ?

Source: https://www.computerhope.com/unix/vim.htm and others …

.vimrc

my vim config file. do backup of the old file first!

test -f ~/.vimrc && cp ~/.vimrc ~/.vimrc.bak-$(date "+%s")
cat << 'EOF' > ~/.vimrc
" sample .vimrc from https://blog.stoege.net/posts/vim/

" Use 2 spaces for tabs
set shiftwidth=2
set tabstop=2
set expandtab
set softtabstop=0
set ruler
set mouse=r

" Disable backup and swap files because they cause more problems than they solve
set nobackup
set noswapfile

" Display line numbers
set number

" Color
syntax on
" colorscheme delek
EOF

show whitespaces

:set list

show numbers

:set numbers

ignore case

:set ignorecase

Convert File to xxd (hex editor)

:%!xxd

Revert to VIM

:%!xxd -r

Search & Replace

search for ‘box’ from line 1 to the End of the File and replace it with ‘BOX’

OpenBSD 7.3 - Diskusage

New Proposal for 7.3

there is an request for at least 1.1GB free Storage at the /usr Partition when upgrading your systeme with sysupgrade. so, i have to adapt my settings a bit for new vm’s with at least 25GB Storage.

Example with 20GB

a 4G  /
a 1G  swap
a 1G  /tmp
a 4G  /var
a 6G  /usr
a *   /home (ca. 4 GB)

Example with 25GB (Vultr)

a 4G  /
a 2G  swap
a 2G  /tmp
a 6G  /var
a 6G  /usr
a *   /home (ca. 5 GB)

which results in:

root@puffy# df -h
Filesystem     Size    Used   Avail Capacity  Mounted on
/dev/sd0a      3.9G   55.8M    3.6G     2%    /
/dev/sd0g      4.8G    2.0K    4.6G     1%    /home
/dev/sd0d      1.9G   10.0K    1.8G     1%    /tmp
/dev/sd0f      5.8G    1.4G    4.1G    26%    /usr
/dev/sd0e      5.8G    7.7M    5.5G     1%    /var

Example with 32GB

a 4G  /
a 1G  swap
a 2G  /tmp
a 8G  /var
a 8G  /usr
a *   /home (ca. 9 GB)

which results in:

root@puffy# df -h
Filesystem     Size    Used   Avail Capacity  Mounted on
/dev/sd0a      3.9G    876M    2.8G    24%    /
/dev/sd0g      8.7G    119M    8.1G     2%    /home
/dev/sd0d      1.9G    108K    1.8G     1%    /tmp
/dev/sd0f      7.8G    2.6G    4.8G    35%    /usr
/dev/sd0e      7.8G   19.6M    7.3G     1%    /var

Example with 40GB (Hetzner)

a 4G  /
a 2G  swap
a 2G  /tmp
a 16G /var
a 8G  /usr
a 8G  /home (ca. 8 GB)

which results in:

root@puffy# df -h

Example with 80GB (Hetzner)

a 4G  /
a 4G  swap
a 4G  /tmp
a 16G /var
a 16G /usr
a 16G /home
a *   /data (ca. 16 GB)

which results in:

root@template74 # df -h
Filesystem     Size    Used   Avail Capacity  Mounted on
/dev/sd0a      3.9G    220M    3.5G     6%    /
/dev/sd0h     15.5G    2.0K   14.7G     1%    /data
/dev/sd0g     15.5G   14.0K   14.7G     1%    /home
/dev/sd0d      3.9G   14.0K    3.7G     1%    /tmp
/dev/sd0f     15.5G    2.0G   12.7G    14%    /usr
/dev/sd0e     15.5G   10.6M   14.7G     1%    /var

Any Comments ?

sha256: 98fa116cf8d4782253fc3da12042383893d396b1ad8d8c146a9e3dfd6c20e7d9

FreeBSD - Upgrade to 13.2

Upgrade FreeBSD 13.1 to 13.2

reading some NewFeeds, FreeBSD 13.2 got released … Let’s do an upgrade and see if it’s working fine.

Patch it first

freebsd-update fetch
freebsd-update install

reboot

may not needed, but you have to boot anyway a few times …

Fetch and Upgrade to 13.2

this needs some time ! depending on your internet speed, and specially to power and filesystem performance of your machine. 5-10min for a common VM is not unreal :(

Softraid on OpenBSD

Softraid

Inspired by a book from MWL - OpenBSD Mastery Filesystems, here some Notes ..

Target

build a RAID with 3 Disks, add some Data, destroy one Disk, and rebuild the Raid (and it’s Data).

Requirements

  • OpenBSD 7.2 Running
  • added 3 Disk with 20G each: sd0, sd1, sd2

Find Disks

root@puffy # dmesg |grep -i sec

wd0: 64-sector PIO, LBA, 20480MB, 41943040 sectors
sd0: 20480MB, 512 bytes/sector, 41943040 sectors
sd1: 20480MB, 512 bytes/sector, 41943040 sectors
sd2: 20480MB, 512 bytes/sector, 41943040 sectors

sd0, sd1, sd2 are New Disks for RAID